Objective |
Install SAP IDES 4.7x200 in Microsoft VirtualPC |
Support |
We only support our donators. |
Contributor |
Albertus Reinandang ( reinandang@yahoo.com ) Dadan Ridwan ( dadanridwan@yahoo.com ) Ahmad Imron ( al750n@yahoo.com ) |
CPU Requirement for Portabel IDES 4.7x200 :
1.Windows Server 2003, Standard Edition (32-bit x86); Windows Server 2003, Standard x64 Edition; Windows Vista Business; Windows Vista Business 64-bit edition; Windows Vista Enterprise; Windows Vista Enterprise 64-bit edition; Windows Vista Ultimate; Windows Vista Ultimate 64-bit edition; Windows XP Professional Edition ; Windows XP Professional x64 Edition or Windows XP Tablet PC Edition
2.VirtualPC application
3.Processor : Celeron 1,4 MHz (minimum)
4.Ram : 1,5 GB minimum and 2 GB recommended
5.Hardisk Internal or External : 80 GB (minimum)
Requirement
All step is already tested using this requirement
1.CD or ISO Windows Installation (Recommended : Windows XP Pro or Windows Advanced Server 2000)
2.Source SAP IDES 4.7x200 Installation and Original Manual Installation(download)
3.Microsoft VirtualPC (download)
4.Java Runtime Edition (j2re)
Create Portable IDES 4.7x200
Now, we will show to you how to install IDES 4.7 using Oracle database. Follow this instruction bellow :
1.Copy all file in SAP Installation DVD into your hard drive and followed this folder structure :
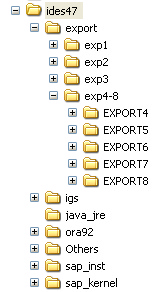
Notes: This folder structure can help you. You will not insert any DVD into your DVDRom during the installation.
2.Share your "ides47" folder
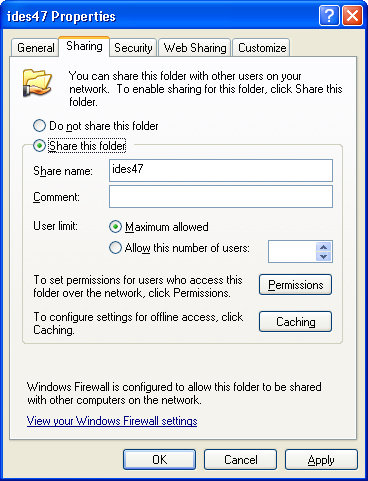
If your CPU not connected to LAN, then you must Install LoopBack Adapter.
3.VirtualPC Preparation
1.Run sapinst.exe from "..\ides47\sap_inst\SAPINST\NT\I386" .
2.Select ABAP System > Unicode > Install a Central Instance
|

3.Fill SAPSID (3 digits) and Instance Number (2 digits)
Example SAPSID = "M01" and Instance Number = "00"
|

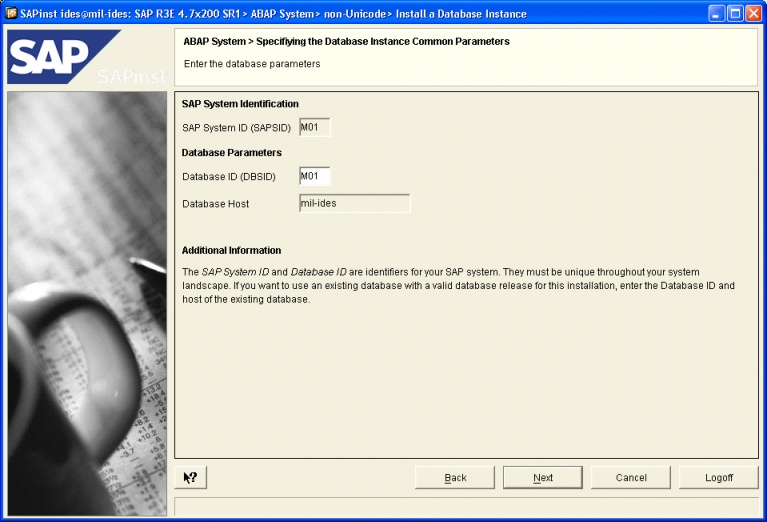
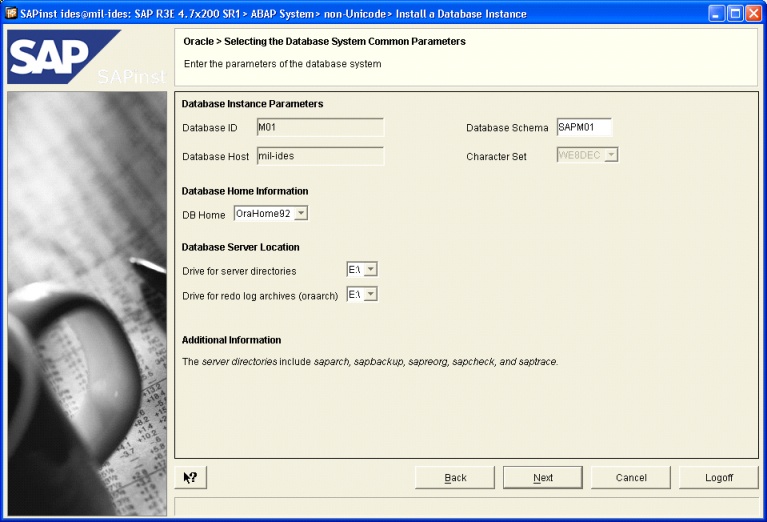
4.Fill Database ID and Host.
Notes: If you install a fresh new IDES, then don't change anything.
|

5.Set and allocated instance memory a least 3/4 of Total Ram
|

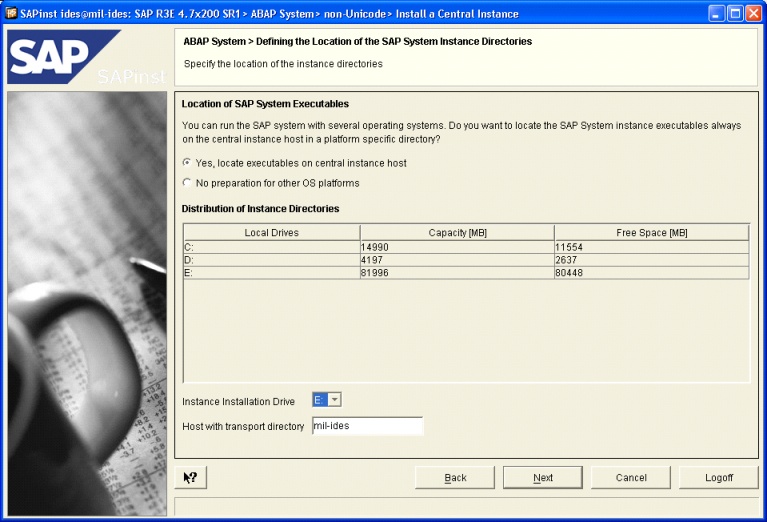
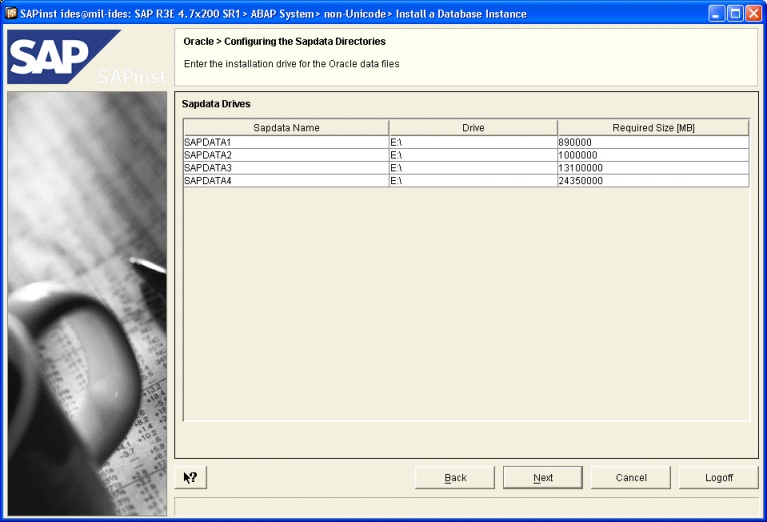
6.Select Instance Installation Drive in the most large space. Minimum free space is 78 GB.
|
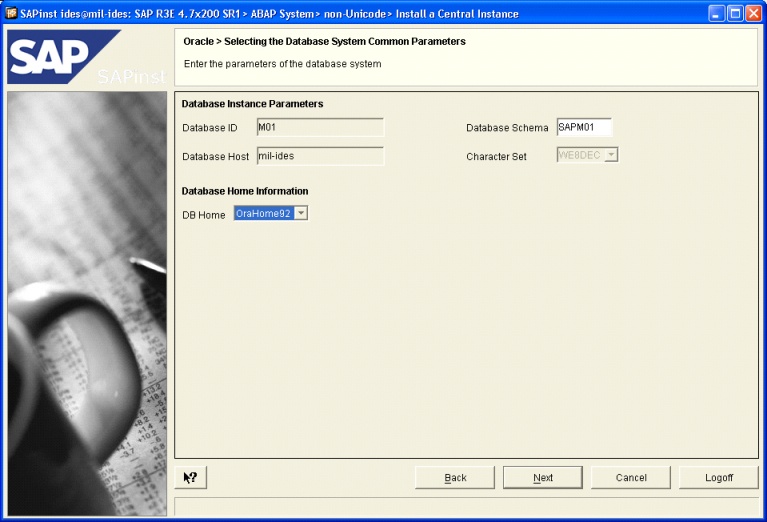
7.Select DB Home according to Oracle92 Installation
|
8.Fill SAP System Administrator Password. eg : "123456789"
|

9.Fill SAP System Service Administrator Password. eg : "123456789"
|

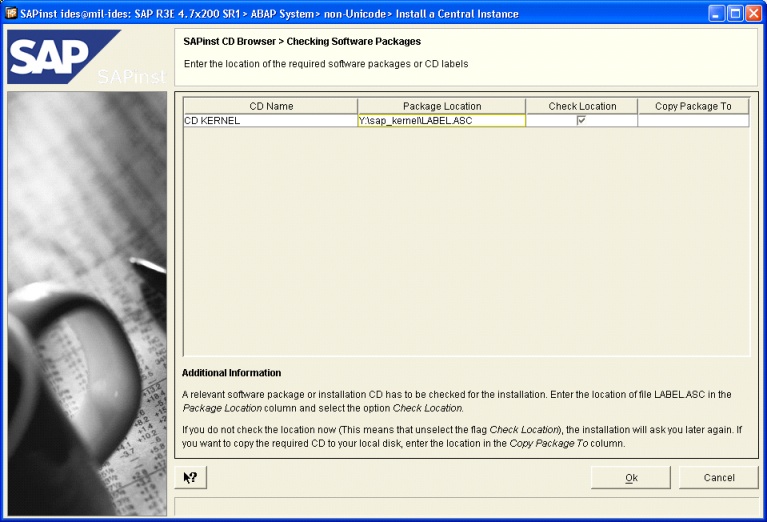
10.Select Kernel Package from "..\sap_kernel\LABEL.ASC"
|
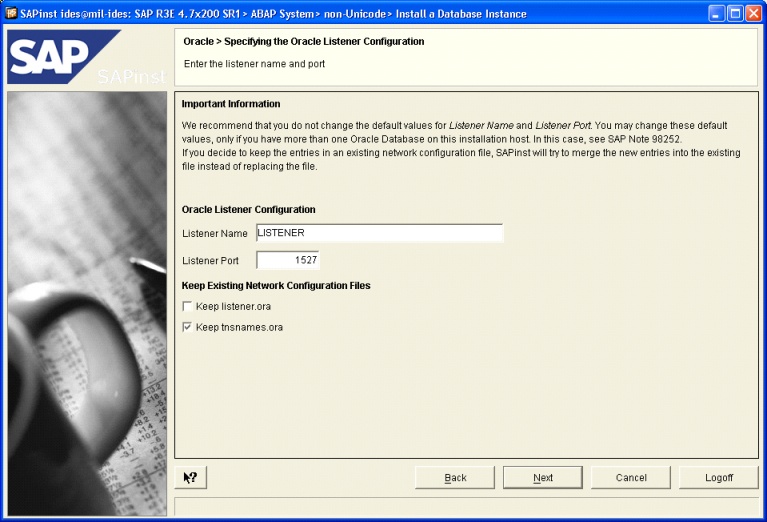
11.Set SAP System Ports. eg : 3600
|

12.Select IGS folder from "..\igs\LABEL.ASC"
|

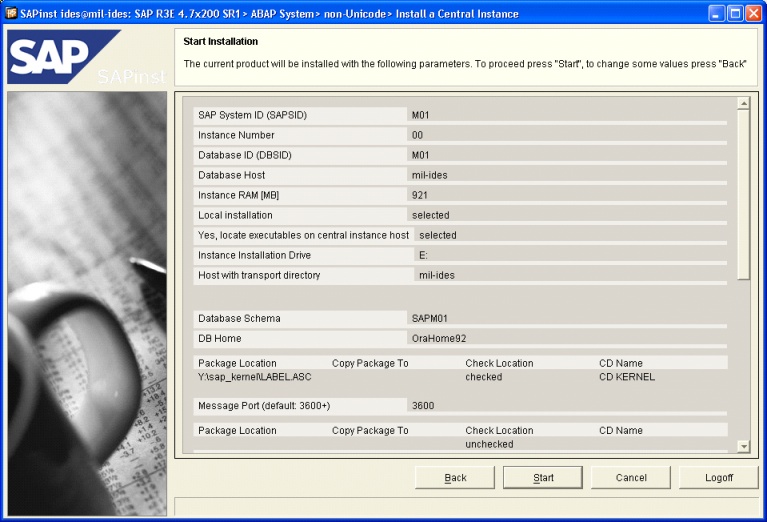
13.Start "Central Instance" Installation
|
14.Wait until installation progress is finished and Restart the Windows
1.Run sapinst.exe from "..\ides47\sap_inst\SAPINST\NT\I386"
2.Select ABAP System > Unicode > Install a Central Instance
|

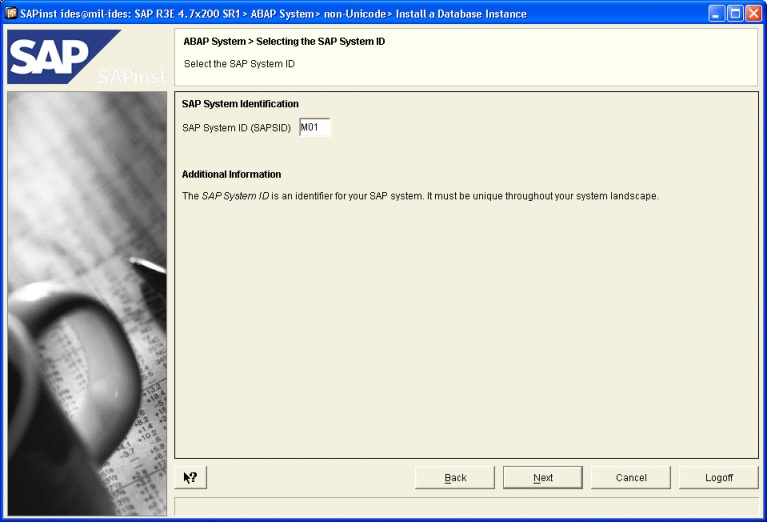
3.Fill SAP System ID with M01 according to "Install SAP Central Instance" point 3
|
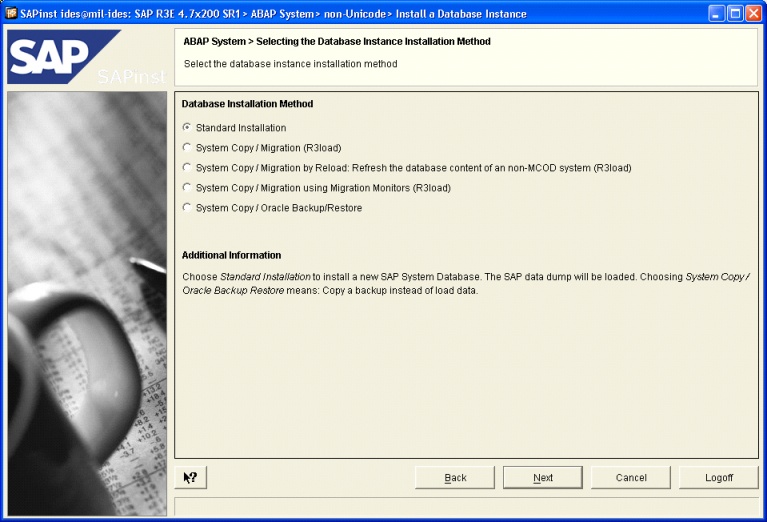
4.Select "Standard Installation"
|
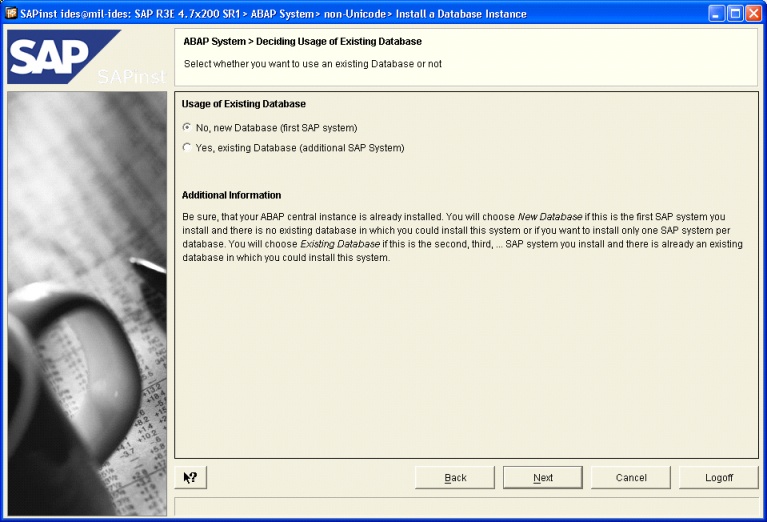
5.Select "No, new Database..."
|
6.Same with point 2,
|
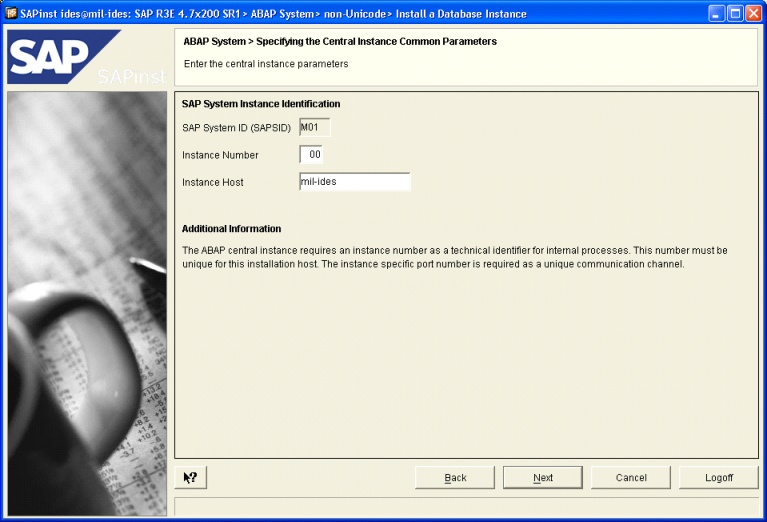
7.Fill Instant Number with M01 and Instance Host with mil-ides, according to "Install SAP Central Instance" point 3
|
8.Select "Local Installation", and don't change Instance RAM. Leave it as default.
|

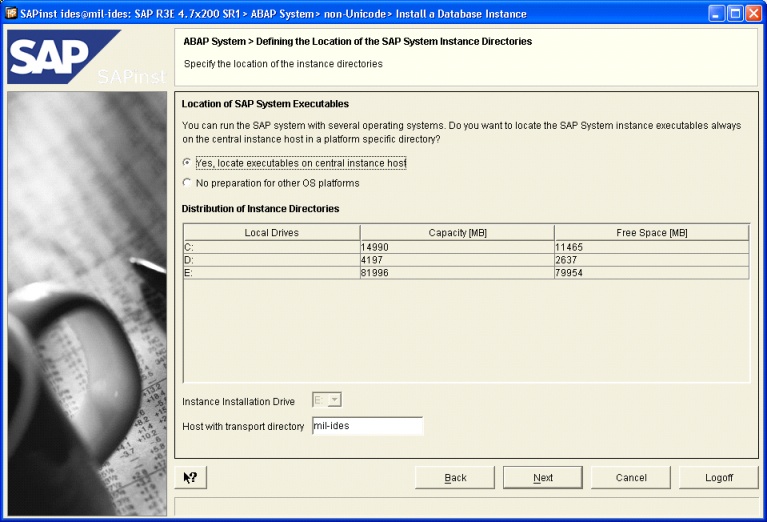
9.Select "Yes, locate executable on central instance host". Because in Portable IDES, Central Instance and Database Instance must be locate in the same machine.
|
10.Leave it as default
|
11.Click next
|
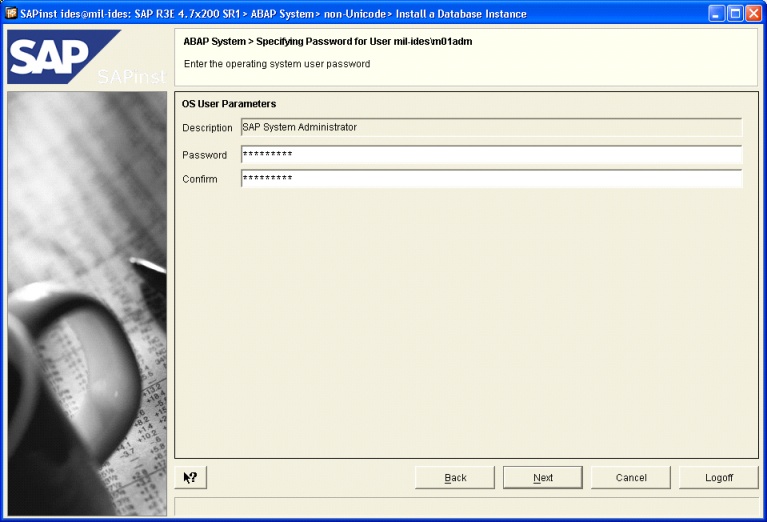
12.Fill OS User on <hostname>\m01adm. We recommend that you must fill the same password with the password when you install SAP Central Instance. eg : "123456789"
|
13.Fill OS User on <hostname>\SAPServiceM01. We recommend that you must fill the same password with the password when you install SAP Central Instance. eg : "123456789"
|

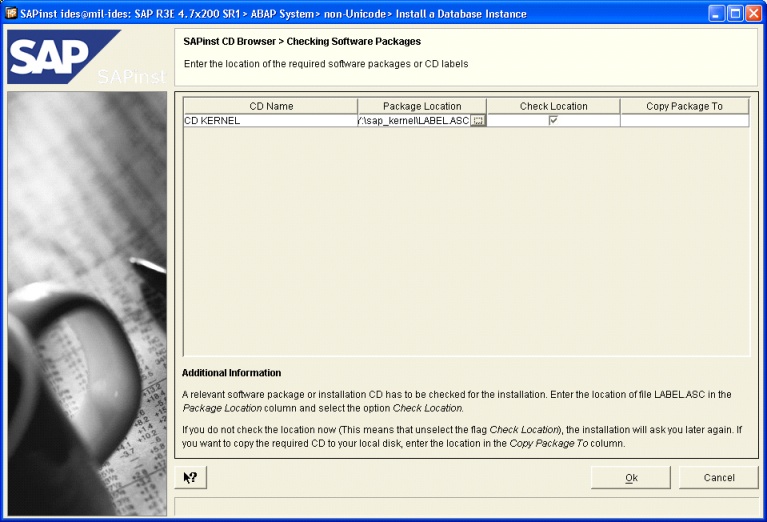
14.Select CD Kernel from "..\sap_kernel\LABEL.ASC"
|
15.Leave it as default
|
16.Leave it as default
|

17.Leave it as default
|

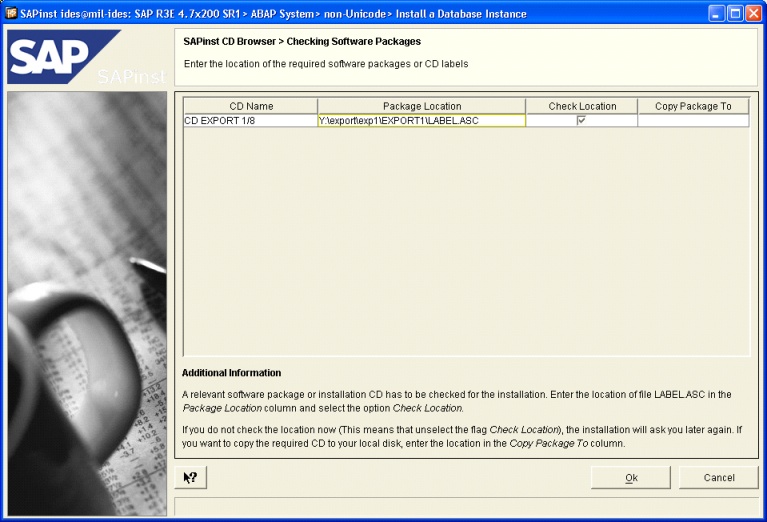
18.Select CD Export 1/8 from "..\export\exp1\EXPORT1\LABEL.ASC"
|
19.Leave it as default
|
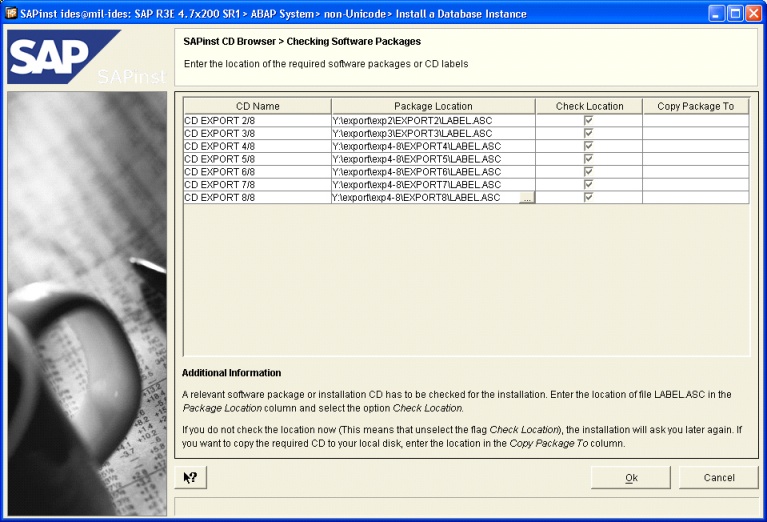
20.Select CD Export 2-8/8 from "..\export\exp*\EXPORT*\LABEL.ASC"
|
21.Leave it as default
|

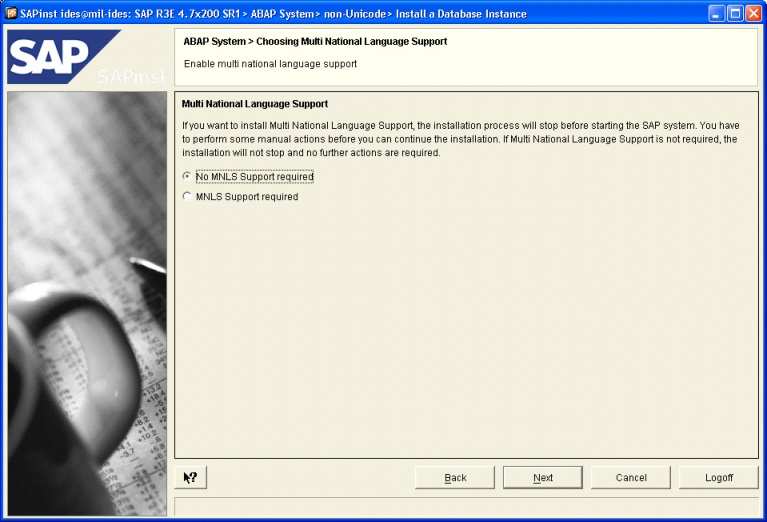
22.Select "NO MNLS ...", because you are not need this feature and can save amount of hardisk space.
|
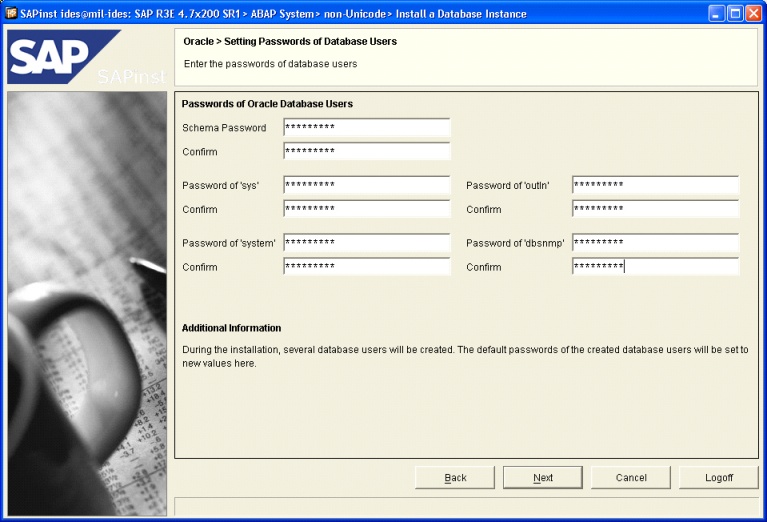
23.Like usual, fill all the password with the same password before. So someday, you can avoid forgot your password.
|
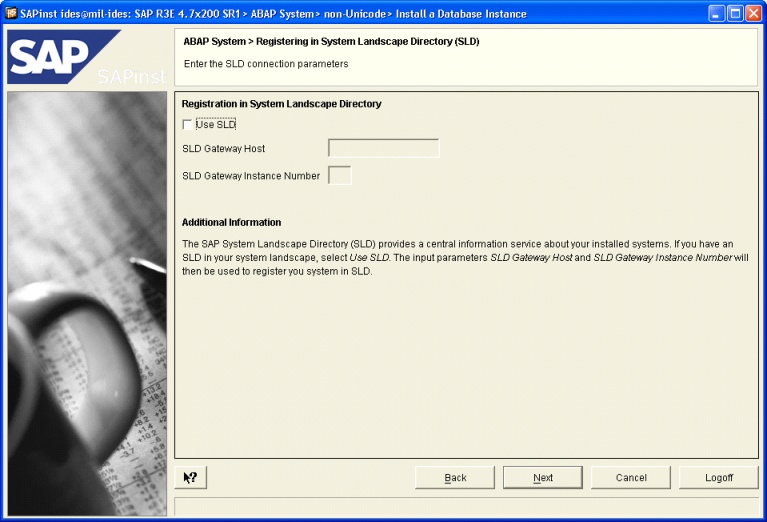
24.Uncheck "Use SLD", we're not need this feature.
|
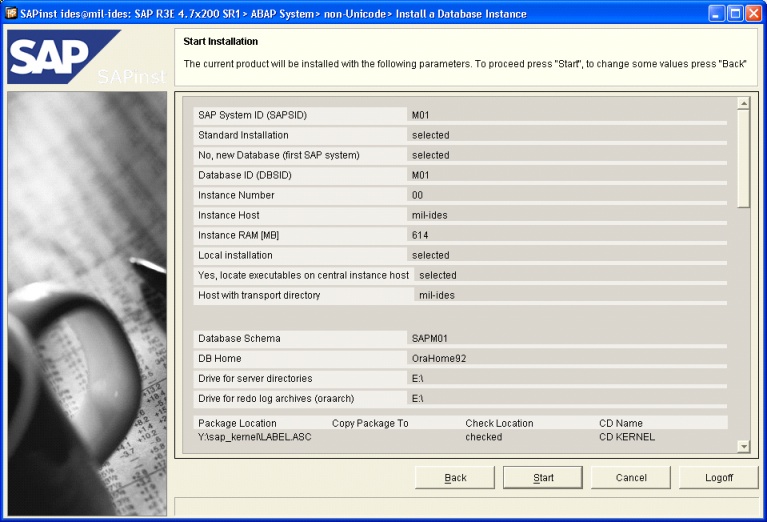
25.Start "Database Instance" Installation
|
26.Wait until installation progress is finished.
If there found any error then installation will take 1 - 2 days until finished, depend to your hardware specification and external hardisk speed.
We recommend that you should used DDR2/DDR3 (dual channel), Processor multi core and high speed external hardisk (eg : using e-SATA port or Firewire)
Progression 1 : "Create Tablespaces" into Oracle database

Progression 2 : "Database Load (post processing)" is the most takes time. Please be patient!!

Progression 3 : From Progression 2 to 3 is need 14 hours
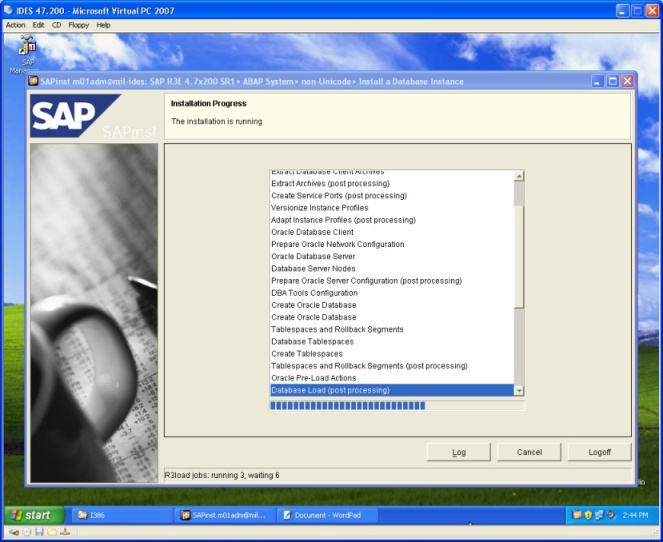
Progression 4 : From Progression 3 to 4 is need 4 hours
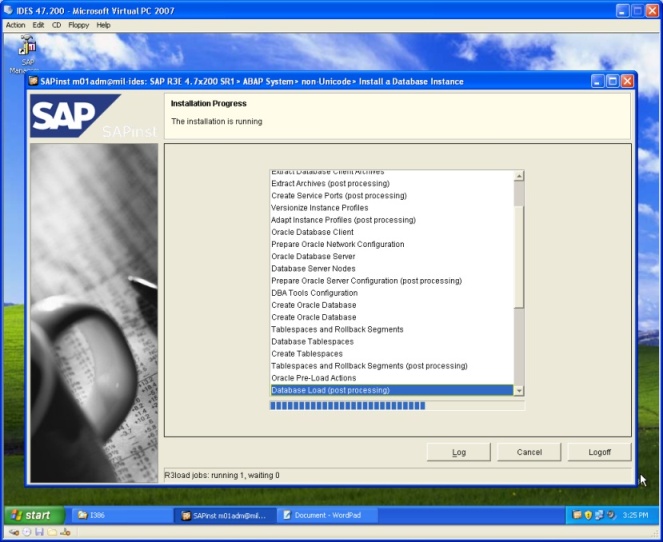
Progression 5 : Update Database Statistic.

Progression 6 : From Progression 5 to 6 is need 4 hours
Installation Almost Finished
Note :
It might you'll find some error during installation.
Donators can get free of error handling documentation.
Also, donators can call us to get any support about installation issue.
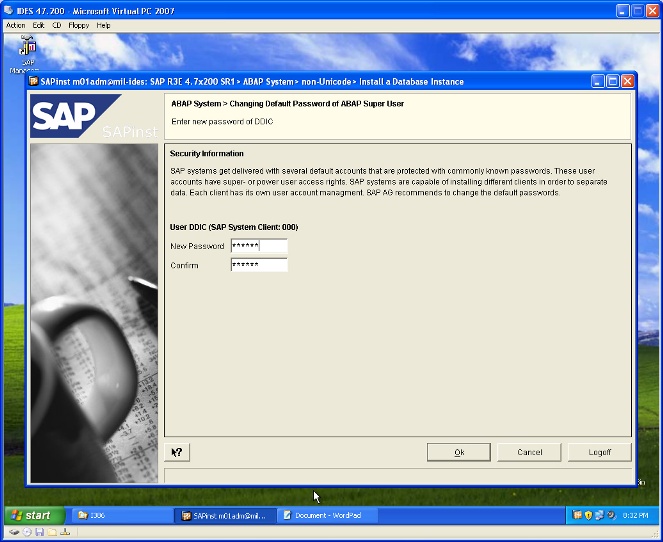
27.Fill your password for user DDIC at client 000. eg: 123456
|

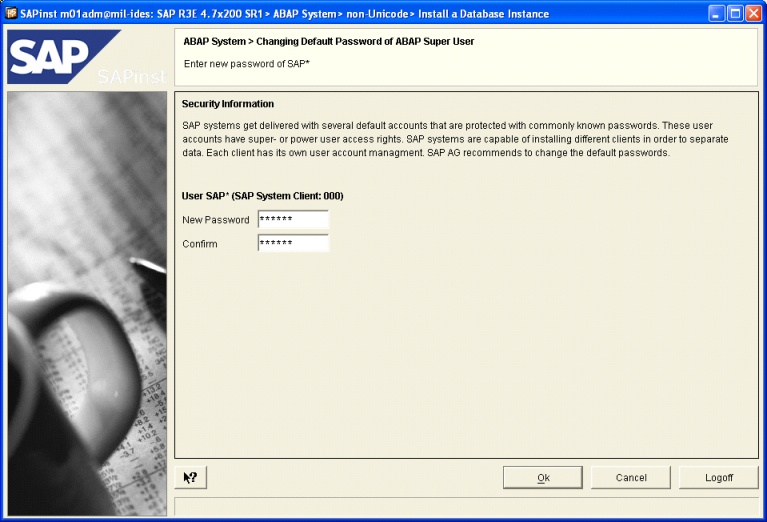
28.Fill your password for user SAP* at client 000. eg: 123456
|
29.Finished Installation
|
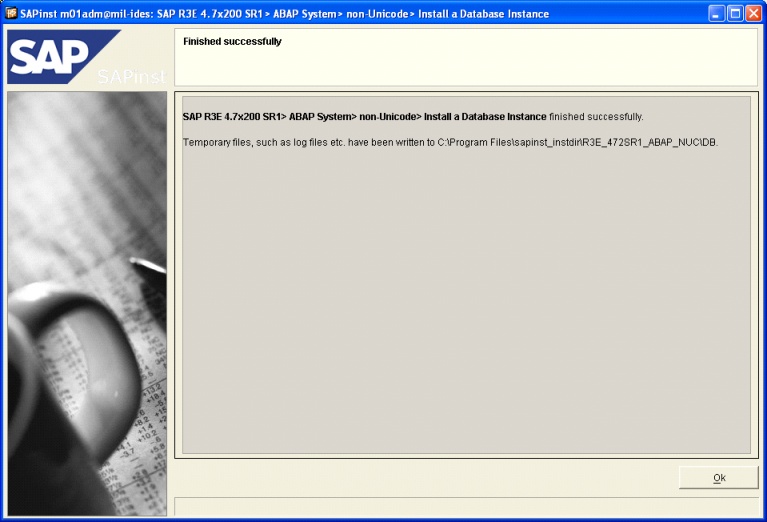
30.Click OK and Restart the Windows
1.Run IDES
2.Install SAP GUI or PaltinGUI for Windows
3.Run SAP GUI
4.Create new Logon, click "![]() "
"
5.Fill all field with parameter according to SAP Central Instance installation
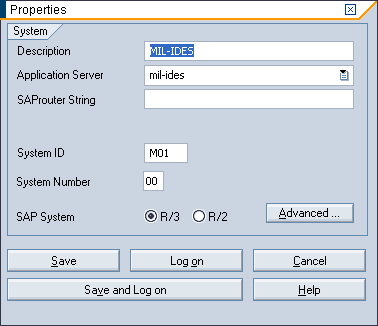
6.Click "![]() "
"
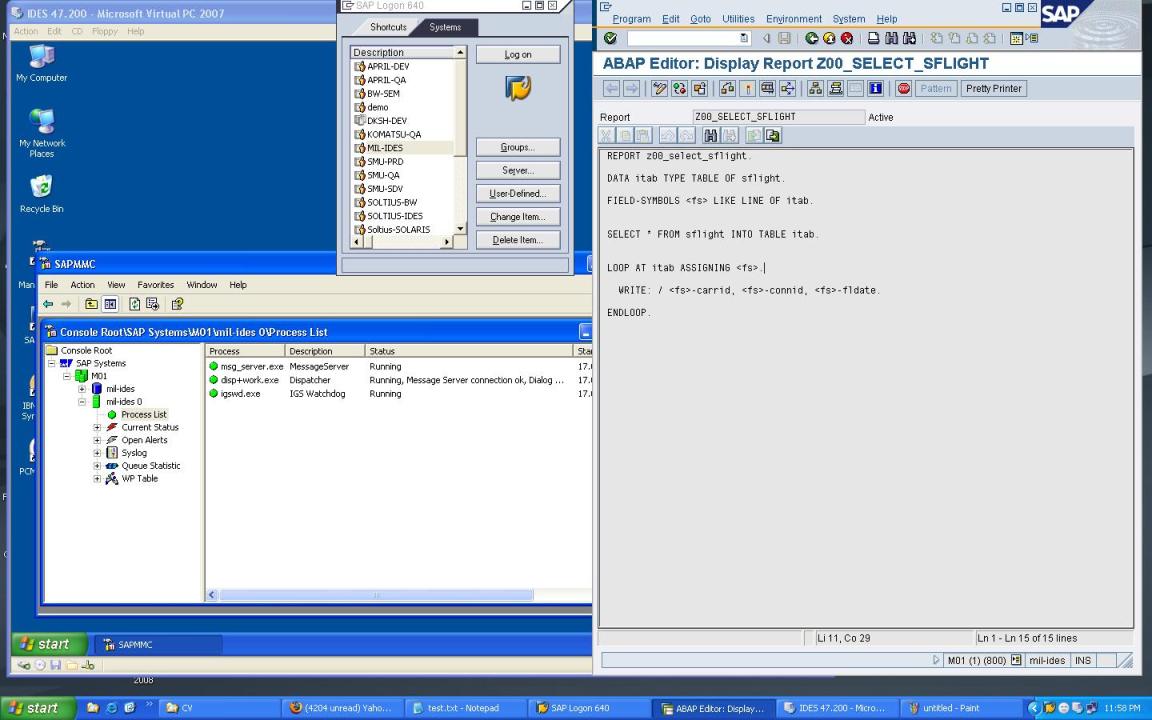
7.If SAP Logon screen is appear then you have succeed install Portable IDES.
8.Now, fill logon field with
Client : 800
User : SAP*
Pass : 06071992
Lang : EN
9.Press enter to Logon to SAP
10.Congratulation :-)
This's screen capture from our Portable SAP IDES 4.7x200
Contributors
Ahmad Imron for SAP IDES 4.7x200 Source
Contact us to get more Information or assign to be our donators :
Email : support@sap-interface.com
Call : 081311162999 (Dadan Ridwan) or 08881904728 (Albertus Reinandang)